Welcome to Crafting an Effective Quiz with Digioh!
Welcome to the exciting journey of creating a compelling product recommendation quiz with Digioh! We're thrilled that you've chosen to explore this innovative approach to engage your audience and enhance their shopping experience.
Part 1
Why Use a Quiz?
- Personalization - A well-crafted quiz allows you to tailor recommendations based on individual preferences, creating a personalized shopping journey for each user.
- Increased Engagement - Quizzes are inherently interactive and can captivate your audience's attention, encouraging them to spend more time on your platform.
- Data Collection - Through thoughtful quiz questions, you can gather valuable insights into your audience's preferences and behavior, helping you make informed decisions for your product offerings and marketing strategies.
- Conversion Boost - Personalized recommendations increase the likelihood of converting potential customers into satisfied buyers by presenting them with products that align with their needs and desires.
How to Approach Your Quiz:
- Define Your Objective - Clearly outline the goal of your quiz. Whether it's to drive sales, gather data, or enhance user experience, a well-defined objective will guide your question selection and design.
- Understand Your Audience - Tailor your questions to your target audience. Consider their demographics, interests, and pain points. The more relevant your questions, the more accurate and beneficial the recommendations will be.
- Keep it Simple - Aim for a user-friendly experience. Ensure that the quiz is easy to navigate, and the questions are clear and concise. Avoid overwhelming users with too many questions.
- Balance Fun and Insightful Questions - Mix in entertaining and lighthearted questions with more data-driven inquiries. This keeps users engaged while providing you with the information needed to make accurate recommendations.
- Utilize Visuals - Incorporate images or visuals related to your products. This not only enhances the user experience but also aids in showcasing the recommended items effectively.
- Test and Iterate - After launching your quiz, monitor its performance and gather feedback. Use this information to make improvements and refine your quiz for better results.
Prepare to Create Your Quiz!
Before we dive right into setting up your quiz in Digioh, it's important to go over the following key items.
1. Establish your Questions and Answers -
- Our Quiz Experts have seen countless quizzes and recommend, to see max conversions, a quiz should have no more than 6 questions (maximum 8).
- When thinking about your questions, prioritize your Consumer's interests before you look to collect your zero party data. We recommend adding your email, name, or phone questions after establishing how your Consumer is looking to shop your site.
2. Note how your Shopify products are organized (products, variants, etc.)
3. Brainstorm how you're going to showcase your results
At Digioh we have 2 ways of generating Quiz Results and we call these "Results Logic"
Weights Logic -
- When using Weights for your Results Logic, each answer option is assigned a numerical weight or score
- When a user selects an answer, the score associated with that answer is added to their total score
- The final result is determined based on the cumulative score obtained by adding up the scores of all selected answers
- This approach is useful when you want to give different levels of importance or significance to each answer option
- EX. In a Quiz about Shoes, we would care more about if your Consumer is a child vs an adult than we would about their color preference
Outcomes Logic -
- When using Outcomes for your Results Logic, you define which specific products you want in the results based on a set of answers
- When a user selects a set of answers, they are directly assigned a particular set of "Outcome results" associated with those answers
- This approach is useful when you want to showcase specific products
- EX. In a Quiz about Jewelry, we could promote a few specific products depending on your Consumer's answers regarding the occasion they're shopping for
4. Install Digioh on your site How to Install Digioh in your Shopify Theme
5. Are you going to include quiz branching logic?
Part 2
1. Install Digioh
All Digioh.com products require that you have our JS Tag installed on your website. If you have not already Installed Digioh on your site, this is a quick step so let's get right into it!
1. In your account, click your username drop down

2. Select "Setup Instructions"
3. Scroll down to "Step 1." and select "Fast Activation" from the drop down
For all quizzes, we recommend the "Fast Activation" JS Tag. For deeper insights into our JS Tag options, please see our document on installing Digioh.

4. Click "Copy to Clipboard"

5. Go to your Shopify Admin portal

6. Navigate to your Shopify Theme's code
Click "Themes"
7. Click "..." next to "Customize", and "Edit Code"

8. Open your theme.liquid file, and locate the closing "head" html tag ( </head> )
You may need to scroll down to find this closing tag ( </head> )


9. Simply paste the Digioh JS Tag, hit "Save", and we're ready for the next step!

2. Create a New Quiz
Follow these steps to set up your quiz using the Digioh Qwizard.
1. In your account, click "Create New Quiz."

2. Choose a location on your website for the quiz
For a Product Recommendation Quiz, we recommend an Inline lightbox. This will be embedded in your site on either it's own page or on a page of your choosing

3. Choose a theme for your quiz and click OK.

4. Name your quiz.

5. Select "Shopify" from the Store Type dropdown.

6. Enter your Shopify Store Information:
- Shopify Store URL
- Product Organization (e.g. "Products" vs "Variants").
After entering your Shopify URL, Digioh connects to your Shopify Products, so you can easily assign weights to power your product recommendations.

7. Select "Klaviyo" from the integration dropdown, then enter your Klaviyo Public Key and Private Key.
Digioh needs this information to send your product data and product recommendations to Klaviyo, allowing you to see every answer click in Klaviyo. This means you can send highly personalized emails, including a triggered dynamic email with personalized product recommendations right after the quiz. (This dynamic email is usually the highest converting email.)

8. Connect your Google Analytics
Connecting Digioh to your Google Analytics Property is how you enable measurement of your Quiz's success through conversion rates, revenue and much more. Do not skip this step! By connecting your Google Account and Google Analytics with Digioh, this will also connect your quiz so that you can measure and track views, interactions and other important metrics for your quiz and benefit from the power of Google Analytics and Digioh together.
9. Set up your Email Collection Page.
Capturing an email is a great way to grow your list and drive post-quiz revenue.
You can also include a "Skip" button so users aren't required to provide their email address).

10. Set up your Splash Page.
The splash page is typically your quiz's Start Page, like "Start Quiz" or "Do you want to Take a Quiz". This page is optional; you can also start the quiz with the first question. We recommend NOT having a splash page, this is often the step where you have the most user drop off.

11. Set up the first question of your quiz.
Each question and answer will be used to provide a personalized product results that the quiz outputs

12. Repeat Step 11 - Set up the first question of your quiz - for each question of your quiz.
13. Click "Done" at the bottom of the page to move on through the QWizard

14. Edit the Design of your quiz
Navigate to the "Design" tab of the QWizard

From here, you can add your Global Design Settings. This allows you to easily design all elements based on type (for example, choose the design of all of the buttons in the quiz, all of the text in the quiz, etc.
Available options include:
- Setting a campaign layout and background for your quiz using border, background color, background image, tc
- Adding custom fonts to match your site's fonts
- Setting Question text size and font to your preferred design throughout the quiz
- Setting button borders and fonts to be your preferred design throughout the quiz
Remember, as you add design settings, don't forget to click "Save" every so often!

15. Wait for Digioh to generate your quiz.

3. Connect GA4 to Digioh
If you have already Authenticated your Google Analytics account with Digioh, you can skip this and move on to the next Step. However, if you skipped the Google Analytics steps while in the Qwizard, you should now take the time to Authenticate your GA account with your Digioh account.
Why Should I Connect My GA to Digioh?
Connecting your Google Analytics (GA) account to Digioh is crucial for accurate attribution tracking and obtaining comprehensive insights into your marketing efforts. Here's why it's important -
- Attribution Tracking: Digioh relies on Google Analytics to track attribution, which means it identifies the sources of traffic and conversions on your website. Attribution tracking helps you understand which marketing channels and campaigns are driving the most valuable traffic and conversions. By connecting your GA account to Digioh, you ensure that Digioh has access to the necessary data for accurate attribution tracking.
- Optimization Opportunities: Accurate attribution tracking allows you to identify the most effective marketing channels and campaigns. With this information, you can optimize your marketing strategies by reallocating resources to high-performing channels and improving underperforming ones, ultimately maximizing your ROI.
- Comprehensive Insights: Google Analytics provides a wealth of data about your website's performance, including traffic sources, user behavior, conversion metrics, and more. By connecting your GA account to Digioh, we're able to provide a deeper analysis of your website's performance and marketing effectiveness.
- Data Accuracy: Connecting your GA account to Digioh ensures that the data used for attribution tracking and analysis is accurate and reliable. Since Google Analytics is widely recognized as a reliable source of website data, leveraging its data through Digioh helps ensure the accuracy of your attribution tracking and insights.
1. In your account, open your Username Drop Down
2. Click "Google Analytics Integration"
3. Choose the appropriate Google Account
Your Google Analytics account will need to have Admin or Editor access in order to authenticate with Digioh

4. Allow Digioh the necessary permissions to link with your Google Analytics by clicking "Allow"

5. Success! You have connected your account!
For more information, you can find our GA4 documentation linked here.
4. Customize your Quiz
If you would like to make updates to your quiz, you can do so in the editor:
- Access the editor by navigating to the "Boxes" section of your account

- Click the "Preview" button next to the quiz you want to update, then select "Editor" to edit your quiz.


Helpful Links for customizing your quiz:
- Digioh Editor Overview
- How to add a Page Background Image in the Editor
- How to make a Branded Quiz with Custom Fonts
If everything looks good, proceed to the next step.
5. Configure Your Quiz Results Logic
Ideally, this step will be completed when building the quiz in the Qwizard (in this document Step 2 - Create a New Quiz - Step 11 - Set up a the first question on your quiz). If you did not complete this step while building your quiz in the Qwizard, you must complete it at this point in quiz creation.
There are two methods for weighing your results:
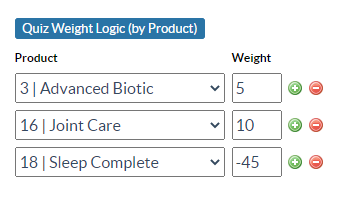
- Advanced Weighting - With this approach, you can add specific weights product by product on an answer button
- In the Editor, click on any button on which you want to weigh a product
- Navigate to the Quiz Weight Logic (by Product) section by scrolling down in the left hand side of the Editor
- Select the product you want to weigh from the input campaign in the "Product" column
- Weigh the product in the corresponding "Weight" column input
- Save your changes
- You can add multiple products in a single button. If necessary, you can negatively weigh products by adding a negative value

- Weighing Based on Property Values - You can also weigh products based on specific product properties, such as SKUs, Names, Categories, etc. By using this approach, you can weigh hundreds of products with a single command.
- In the Editor, click on any button on which you want to weigh a product
- Navigate to the "Quiz Weight Logic (All Products Matching Text)" Section
- Choose the property (ex: "Price") you would like to weigh from the dropdown
- Enter which property option (ex: "0-25") should be weighed
- Enter the appropriate weight in the corresponding "weight" input
- Save your changes


Helpful Links for weighing your quiz:
6. Get Your Quiz on Your Website
The simplest way to install your Quiz on your website comes via our Smart Tag HTML generated right in the Quiz Editor! The Digioh Smart Tag isn't just convenient, it also provides a slick way to further integrate your Quiz with your brand image via the Lightning Load Image.
1. Locate your auto-generated Digioh Smart Tag HTML
Within your quiz editor, scroll to the bottom of the page to view the "Widget Settings" accordion tab


2. Customize your loading image
Under the Smart Tag HTML, you will see where you can configure your Placeholder Image. Otherwise, you may move to the next step

3. Now head over to your Shopify Admin Portal, and head to "Pages"

4. Make a new Page of your Shopify site.
This is where your quiz will live (EX. digiohdemostore.myshopify.com/pages/quiz)
5. Within your page editor, click the < > Brackets to open HTML mode, and paste the entire Smart Tag HTML

6. Don't forget to hit "Save"!
Your Quiz is now installed on your site,
7. Set up Your Shopify Results Page
For users to see their quiz results, you must set up a Shopify results page. Learn how to set up a Shopify results page here.
8. Test your Quiz
It is important to dedicate time to testing before launching your quiz. If this step becomes a hurdle, remember that presence is always preferred over perfection.
You can view how product recommendations appear by using our "Show Results Calculation" functionality. This is available by viewing your quiz in "Preview."
- Access your campaigns by navigating to the "Boxes" section of your account
- Locate the quiz you want to update, and click the "Preview" button. Then, select "Preview" to preview the quiz

- After proceeding to the next page of your quiz, click "Show Results Calculation" in the top-right corner to see a table showing how and why products are weighted at each page of the quiz.


9. Create Breakpoints
After testing your quiz, create any breakpoint designs you would like. If you don't need multiple breakpoint designs, Skip to step 11 - Set up Quiz Display Conditions.
See help here - How to create Breakpoints in Digioh
10. Test Breakpoints
Once the breakpoint is set up, test that the new breakpoints look and function appropriately using the same methods listed in Step 8 - Test your Quiz
11. Set up Quiz Display Conditions
Determine when you want the Product Recommendation Quiz to show, and set campaign conditions accordingly.
See help here - Overview of Using Conditions in Digioh
13. Set up Quiz CTA(s)
To ensure your quiz's success, set up (or ask for our help in setting up) methods to bring users to your quiz.
Some of these include:
- Exit-Intent promotions
- An Exit-Intent lightbox can be leveraged to let your users know there is a quiz available to help them find exactly what they are looking for!
- Sidebar Teasers
- A Sidebar Teaser is a good way to work within your existing design and let user's know at a certain time and place in your store that there is a quiz available to help them find exactly what they are looking for
- Banners
- Banners are great for conversion optimization and attracting traffic! You can use a Digioh Banner to direct users to your quiz and increase engagement
12. Launch your Quiz
To launch your quiz, you need to:
- Remove any test blocks in the conditions of your quiz in the editor
- Set your results landing page live in Shopify
- Set your quiz live in the editor
- Remove any test blocks in the conditions of your CTA options (discussed in step 11)
- Set your CTA options to live in the editor
Want to get more from Digioh?
Get the playbooks leading brands use to convert more visitors into revenue.
Browse the Playbooks ?Platform Tour
See what else you can do with Digioh in our self-guided platform tour.
Take the Tour ?