What You’ll Learn
- How to apply animations to elements or entire campaigns using meta data
- Descriptions of all supported animation types
- How to configure timing, delays, and special animation behaviors
- Best practices and common pitfalls to avoid
Easily add smooth, attention-grabbing animations to your Digioh campaigns using simple meta data. This extension supports transformations, effects, and motion for elements like buttons and text without writing custom code.
To learn the basics of using meta data in Digioh, view our help doc here.
Install the Extension
To install the extension, click on Extensions from your user name dropdown in the platform. Open the “Campaign User Interface ” dropdown and you will find the Animations Extension. Click install, then Publish the Manage Extensions page. Now you’re ready to use the Animation meta data on any campaign!
Supported Animation Types
Use meta data on individual elements or on the whole campaign to apply one or more of the following animations by adding the meta key with the value being “true”.
| Animation | Meta Key | Description |
| Blink | animation_blink | Periodically fades the element in and out |
| Bounce | animation_bounce | Periodic bounce movement up and down. |
| Breathe | animation_breathe | Grows and shrinks gently like a breathing effect |
| Ease | animation_ease | Adds smooth transitions to button hover and state changes |
| Fade In | animation_fade_in | Fades element into view. Duration and delay can be customized via: • animation_fade_in_duration • animation_fade_in_delay |
| Hover Float | animation_hover_float | Moves the buttons upward slightly on hover |
| Hover Grow | animation_hover_grow | Enlarges the element slightly on hover |
| Hover Shadow | animation_hover_shadow | Adds a subtle shadow effect on button hover. Shadow color can be customized via: animation_hover_shadow_color |
| Marquee | animation_marquee | Scrolls element horizontally. Direction and speed can be customized via: • animation_marquee_direction • animation_marquee_speed |
| Nudge | animation_nudge | Periodically shifts the element left and right |
| Pulse | animation_pulse | Creates a glowing pulse around the element. Pulse color can be customized via: animation_pulse_color |
| Shimmer | animation_shimmer | Adds a reflective sweep across the element |
| Wiggle | animation_wiggle | Rotates slightly side-to-side on a loop |
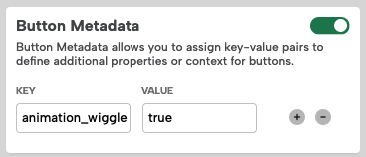
Element-Level Meta Data
Each meta data key is boolean unless otherwise noted. Set the value to true to enable the effect. Within the element’s meta data, use the following format to apply the animation:
animation_wiggle = true
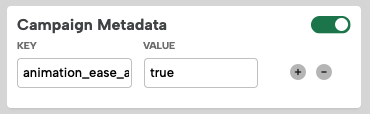
Campaign-Level Animation Controls
There are a few animations available to be added to the campaign level, so that they apply to all buttons in your campaign. To apply animations to every button in a campaign, you can add these meta keys to the Campaign Options meta data:
- animation_ease_all_buttons = true
- animation_hover_float_all_buttons = true
- animation_hover_shadow_all_buttons = true
Advanced Control Meta Data
All animations are built with best-practice defaults to work seamlessly without any additional setup. However, for advanced customization, some animations also support optional additional meta data controls. You can add these in addition the main animation meta data to customize their styling.
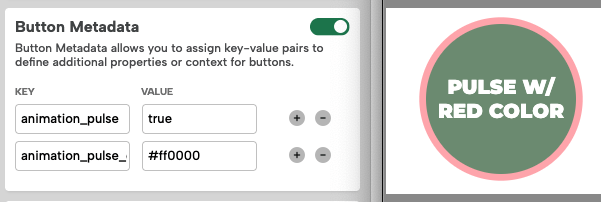
Pulse:
You can change the color of the pulse effect by using any color code such as hex or or rgba.
- animation_pulse_color = rgba(0, 0, 0, 0.4)
Hover Shadow:
You can change the color of the shadow by using any color code such as hex or or rgba.
- animation_hover_shadow_color = rgba(0, 0, 0, 0.4)
Fade In:
You can customize the timing of fade in using the delay and duration meta data below.
- animation_fade_in_delay = 1s
- animation_fade_in_duration = 3s
(“1s” means 1 second)
Marquee:
You can customize the speed and direction of Marquee using the meta data below.
- animation_marquee_direction = left
- animation_marquee_speed = medium
Options for animation_marquee_direction: left, right
Options for animation_marquee_speed: fast, medium, slow
Additional support for delaying animation:
You can set an animation to delay it’s start by using the meta data below. Available on: wiggle, shimmer, breathe, bounce, blink, & nudge.
- animation_[name]_delay = 2s
- (e.g. animation_bounce_delay = 1s)
Best Practices and Recommendations
- Use animation strategically to enhance clarity and promote engagement. Using animations like Pulse, Wiggle, or Nudge on a small teaser can highlight urgency and increase clickthrough.
- Pair hover effects with transitions (e.g., Ease + Hover Float) for smoother UX. You can do this by adding multiple lines of meta data on the element.
- Note that not all animations can be combined due to similar functionalities, so only combine animations where they make sense.
- Use fade-in with delays to sequence element visibility as the campaign loads.
Things to Avoid
- Avoid excessive animation across multiple elements on the same screen. Overuse of animations may distract or annoy users.
- Don’t stack multiple animations that have similar actions on the same element, as only one will be applied. (e.g., wiggle and hover-float both move the button and will not work together)