Dynamic Items can populate a merge tag, letting you inject dynamic values into text blocks, ghost text, URL redirects, button labels, and more. It’s a great way to personalize a Campaign based on the URL, the page, the visitor, or any data source a Dynamic Item can read.
This article covers Dynamic Item merge tags and shows three common examples. For general information on setting up a Dynamic Item, see this help doc.
Where to Find Dynamic Items
Dynamic Items are managed at the campaign level.
- Go to the Campaigns list.
- Find the Campaign you want to personalize and click the three-dot menu in the bottom right corner of that Campaign’s tile.
- Select Add Dynamic Items.
From here, you can create, edit, and order the Dynamic Items that run for that Campaign.
Setting Up a Merge Tag
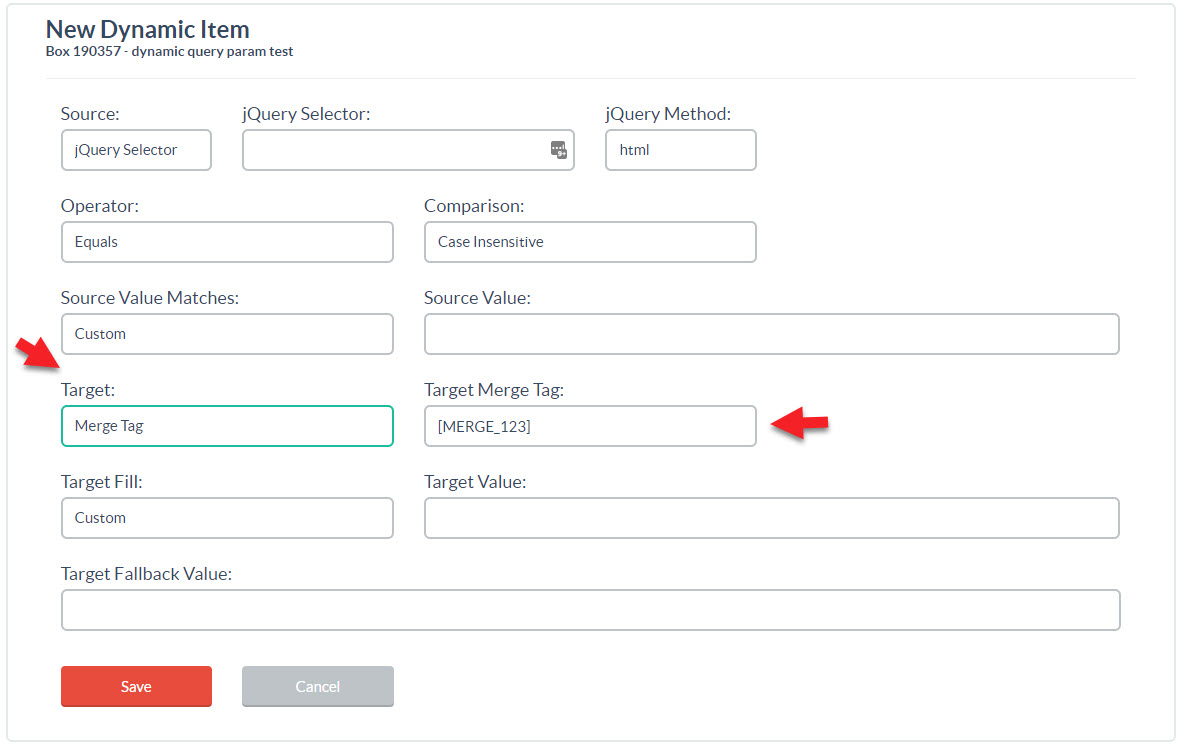
To set a Dynamic Item to populate a merge tag, choose Merge Tag from the Target dropdown, then type the merge tag name.
Merge tag syntax tip: Wrap the name in square brackets and use uppercase letters for readability, e.g. [TOPIC], [URL], [EMAILGHOSTTEXT]. You’ll reference the merge tag using exactly the same name (brackets included) anywhere you want the value to appear.
Merge tags can be used throughout the editor, including text blocks, HTML blocks, button labels, ghost text, hidden field defaults, and URL redirects.
What If There’s No Value?
If the Dynamic Item can’t find a value at runtime, you can configure a fallback so the merge tag is replaced with text you choose instead of being left blank or showing the literal [TAG]. See Dynamic Items: What is the Fallback Value and How Do You Use It? for setup details.
Examples
Here are three common ways to use Dynamic Item merge tags to personalize a Campaign.
Change One Word in a Text Block
To change a single word in a text block dynamically (rather than swapping the whole block), add a merge tag inside the text wherever the word should change.
In this example, the [TOPIC] merge tag is replaced with the value of the topic URL parameter. Here’s the Dynamic Item:
![Dynamic Item configured with Source set to URL Parameter "topic" and Target set to Merge Tag [TOPIC].](https://help.digioh.com/wp-content/uploads/2019/05/topic-di-1.jpg)
In the editor, we placed the [TOPIC] merge tag inside Text 1:
![Campaign editor showing a text block that reads "Join our [TOPIC] newsletter!" with the [TOPIC] merge tag inline.](https://help.digioh.com/wp-content/uploads/2026/05/Screenshot-2026-05-05-162453.png)
With this setup, if the URL is https://domain.com/?topic=marketing, the Campaign will display “Join our marketing newsletter!”
Redirect to an Anchor Point on the Current Page
In this example, we’ll send the visitor to an anchor point on whatever page they’re currently on after they submit the Campaign.
Here’s the Dynamic Item, which populates the [URL] merge tag with the current page’s URL:
![Dynamic Item configured to populate the [URL] merge tag with the current page URL.](https://help.digioh.com/wp-content/uploads/2019/05/url-anchor-di.jpg)
To redirect to an anchor point on that page, set up a button or After Form Submit action like this:
![After Form Submit redirect configured with the URL [URL]#anchor, sending the visitor to the anchor point on the current page after they submit.](https://help.digioh.com/wp-content/uploads/2019/05/Screenshot-2025-03-29-025602.png)
Why use the merge tag instead of just #anchor? A bare fragment may not behave consistently across pages or when the URL contains query parameters. Using [URL]#anchor keeps the visitor on the page they submitted from and lands them at the right anchor, no matter which page that is.
Change the Ghost Text in the Email Field
If your site operates in multiple markets with different primary languages, you can change the ghost text of the email field based on the page’s language.
The Dynamic Item below looks for a meta tag indicating the current page’s language is English and fills the merge tag with the matching ghost text:
![Dynamic Item that reads the page's language meta tag and sets the [EMAILGHOSTTEXT] merge tag to the matching English ghost text.](https://help.digioh.com/wp-content/uploads/2019/05/language-di.jpg)
In the editor, we placed the [EMAILGHOSTTEXT] merge tag in the Ghost Text field of the email field:
![Email field properties panel in the Campaign editor with [EMAILGHOSTTEXT] entered in the Ghost Text field.](https://help.digioh.com/wp-content/uploads/2019/05/Screenshot-2025-03-29-025801.png)
You can repeat this pattern with one Dynamic Item per language to localize the ghost text for each market.