1. Home
  2. Knowledge Base
  3. The Digioh Platform
  4. Pixel-Perfect Positioning and Centering
  1. Home
  2. Knowledge Base
  3. Design Editor
  4. Pixel-Perfect Positioning and Centering

Pixel-Perfect Positioning and Centering

What you’ll learn:

  • Accurately adjust the size and position of elements to the nearest pixel.
  • Effortlessly center elements within your designs.

Making updates to your Campaign Design

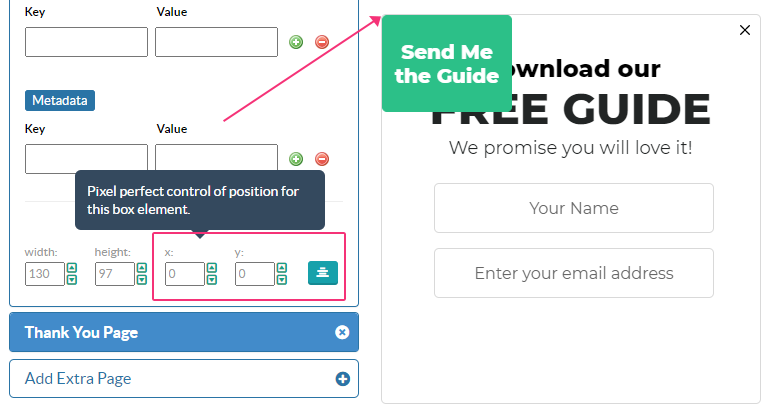
Select the element you want to position (the “Button 1” element in this example). Scroll down to see controls for Button Size and Button Position.

Select element to position

The Button Size values control this element’s width and height. The Button Position X and Y control the horizontal and vertical distance from the upper-left corner of your campaign (where the values are set to 0,0).

Button position

Adjust the width and height pixel values of your button.

Button size

Position your button with the X and Y values.

X and Y values

Finally, you can make sure the button is perfectly centered with the “Center” button.

Center button

Want to make sure everything lines up just right? Toggle on the Grid in the bottom right corner of the campaign editor canvas. This overlays a clean 10×10 pixel grid to help you align your elements more easily by eye.

It’s a simple visual guide, but super effective for keeping your design neat and consistent.

Grid Toggle

To align elements to each other, toggle Align on in the editor.

Align Toggle

With Align enabled, dragging an element displays live horizontal and vertical alignment guides (the X and Y axes).

These guides appear when the moving element’s edges or center line up with other elements or canvas anchors, so you can position items visually and precisely.

Pink dotted lines indicate alignment to the canvas

Canvas Align

while solid blue lines indicate alignment to other elements.

Element Align

Learn More: Using Grid & Snap Tools

Updated on May 15, 2026
Was this article helpful?

Related Articles