When a user submits an email with a form submission, you may want to validate this email with Never Bounce. In order to do this, simply use the Never Bounce Integration App
1. Install the App in your Digioh Account
In your account, navigate to the menu under your account name at the top right of the page. Here, select “Custom Javascript (Apps)”.
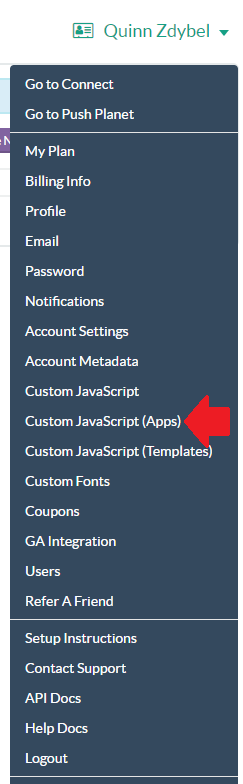
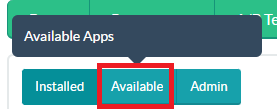
Next, click on the “Available” Tab to see all of the available apps.
Here, scroll down and find the “Never Bounce Integration” app. Click “Install”

2. Set up your Never Bounce Integration
To set up your Never Bounce Integration, navigate to the Integrations tab in your account.
Select the “+ New Integration” button
![]()
Name your integration. Then, under “Integration”, select “Never Bounce”. Finally, select the box you would like to run the Never Bounce validation on.
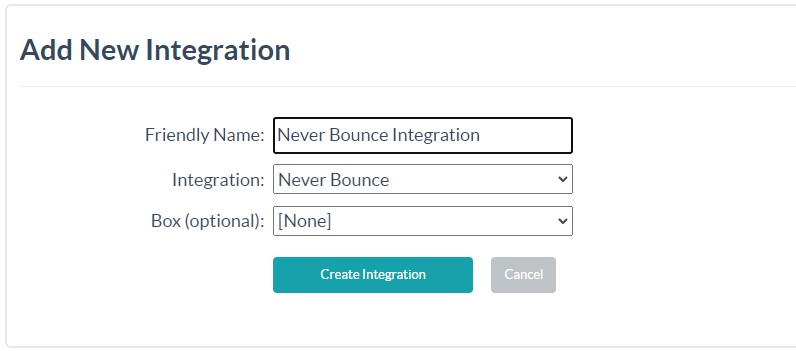
After selecting “Create Integration”, you’ll need to enter your Never Bounce API key and domain.
Once you have set up your integration, on your Integrations page, find the Never Bounce integration Id by looking to the left of the Integration name.

3. Configure Account Metadata
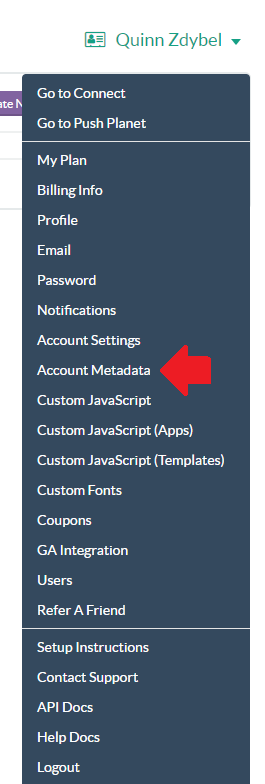
After finding your Never Bounce integration Id, navigate to the menu under your account name on the top right hand side of the page.
Select “Account Metadata”.
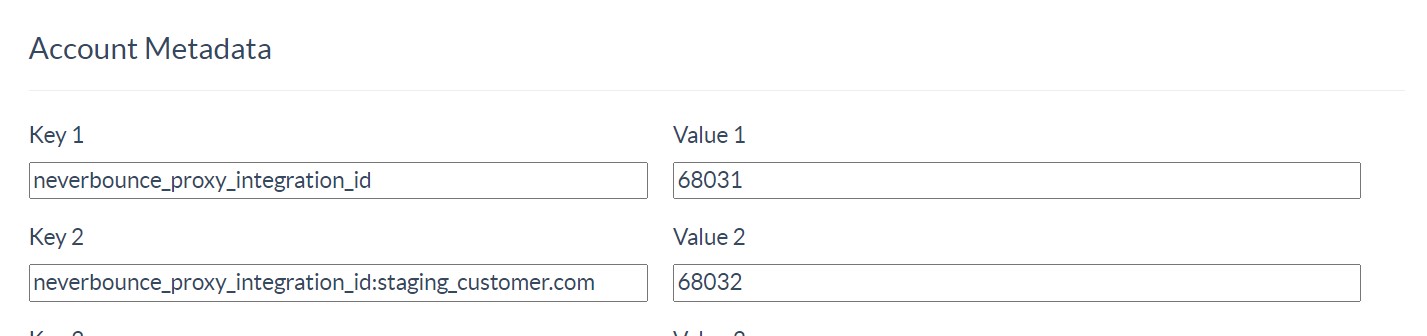
Here, configure metadata key: neverbounce_proxy_integration_id and for the value, put your Never Bounce integration id.

You can also configure site-specific integration IDs. This is useful if you are running multiple sites out of a single Digioh instance and/or have a sandbox site that you want to point to your Never Bounce sandbox:
4. Configure Widget-level Metadata
Navigate to the lightbox you are setting up with Never Bounce and navigate to the Widget tab.
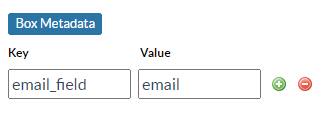
Here, configure metadata using key email_field and then set the value.
For the value, there are a couple of configurations:
- custom_x, where x is the number of the custom field used for email
When a user submits the field configured in the Widget-level metadata, the app will take that field and run the Never Bounce Integration set up on your account. If the validation comes back as true from Never Bounce, the app will continue submitting the form. If the validation returns false from Never Bounce, the app will stop the form from submitting and alert the user.
5. Additional Configuration Options
Never Bounce also offers the additional Result Code values Unverifiable and Unknown. When Never Bounce returns a result of “Unverifiable” it indicates that the domain has been set to “accept all” and there is no definitive way to determine if the email is valid or not. When Never Bounce returns “Unknown” it indicates that Never Bounce did not receive a response from either the domain or the server and thus cannot validate the provided email.
You can configure your box to accept either or both of these responses to allow users to still submit their email address. To do so, you’ll just need to add additional Box Metadata.
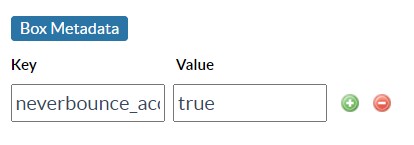
To accept emails that return a response of “Unverifiable”, add Box Metadata: neverbounce_accept_all = true:
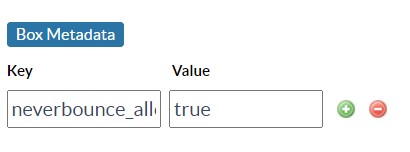
To accept emails that return a response of “Unknown”, add Box Metadata: neverbounce_allow_unknown = true:
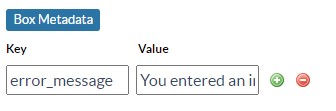
If you want to control the error message displayed for invalid emails, add Box Metadata error_message = <Error Message to Display>:
Questions? Comments? Let us know at support@digioh.com